By age 9 I knew that I would either be a fashion designer or an interior designer. Though I really did not understand what those jobs truly represented I did know that they revolved around fabric – and that was all I needed to know.
My first real adventures with fabric began when I was 10. I chose to stay home from our weekly visit to the lake for the sole purpose of making a dress. Besides a few quick tutorials on how to use the sewing machine and watching my grandmother lay out dress patterns on top of her antique high poster bed, this was unchartered territory.
Little did I know at the time that one day would provide the “hook” that started not only my love of fabrics but of construction and a deeper appreciation of how things came together. By the way I not only made a dress with long sleeves, flared ruffles around the wrists and a bodice, I wore it to school the next day. Never-mind that I did not know what a seam allowance was. Even though It was probably a lopsided mess – I was still proud.
Sewing became a major part of my life for the next 12 years. Ironically, I stopped sewing just a few years after becoming a designer because I realized it was loads more fun to pick it all out, design the draperies, upholstery, cool pillows than to actually make it.
After 48 years as a working designer I am still learning and still making mistakes -but not many! I would like to share some tips with you on how to be “fabric savvy” and save your self some money, time and frustration.
FIRST and most important – Never assume anything. Your drapery and upholstery workrooms have a lot of specific knowledge so pick up the phone and ask. Of crucial importance is to give them really good and thorough information. That requires basic knowledge of some basic terms.
Forgive me if I start off with elementary terms but I have learned that many don’t have basic understanding of fabrics and textiles, how they are made, what widths they come in, if it rolls off the bolt, or if it is rail roaded let alone what a repeat is. So let’s get started with the basics:
WIDTHS OF FABRIC: Most fabrics in the design industry come in 54” widths. However, don’t make the assumption that this is always the case. Always inspect the labels or specs on the fabrics. It is very common for the widths to vary an inch or two from 50” wide to 56” or even 60”. Believe me those inches MATTER so don’t assume anything. The outside edges of the fabric are the selvages. This part of the fabric can be used in a seam but it is never to show on a piece of upholstery.
It’s is also possible that fabrics come in 36”, 48” or even 108” width which represents a double width of fabric. Take nothing for granted. Most furniture companies provide charts to calculate the amount of yardage needed for a sofa, chair, ottoman… The starting point is always the width of the fabric.
DIRECTION THAT THE FABRIC FLOWS:
UP THE ROLL : This is a term that I did not understand for years after I had been a designer. I just assumed ( never do that ) that all fabrics just came off the bolt in one direction. See the diagram below. It basically means that if a bolt was hung on a rod parallel to the ceiling that the fabric would flow off it by rolling down. It does not mean that it could not be used in a different way. It is good however, to realize that you the designer gets to decide on how the fabric will flow.

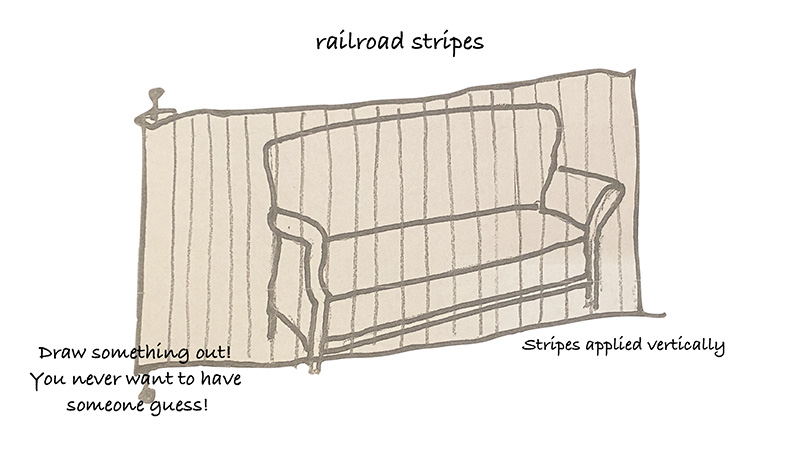
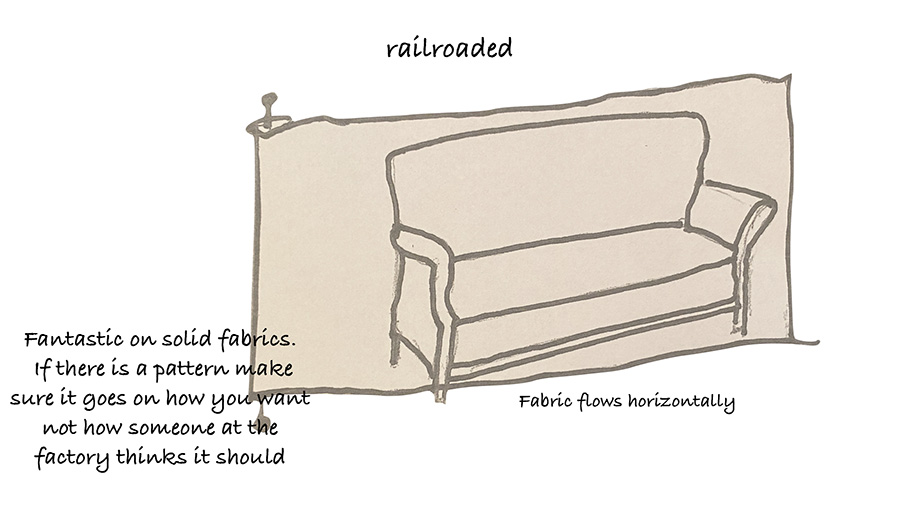
RAILROADED: This terms signifies that the fabric runs horizontally off the bolt so instead of imagining a rod hanging parallel to the ceiling imagine it being hung supporting a rod perpendicular to the ceiling.
Note: It’s important to see how the pattern flows particularly in railroaded fabrics.
(See diagram #4 ) of a railroaded fabric with a stripe.
Though I understood this term when I ordered a sectional with an attached chaise for a family room, I was not prepared to see a seam across the bottom cushion of the chaise roughly 18” from the end of the chaise. You see the fabric had been railroaded so while the seat cushions had no unsightly seams the chaise did as it was 72” long and the fabric was only 54” wide.
At first I had felt sure that the manufacturer had made a mistake. Tip: be slow to make comments in front of your clients until you totally understand something. You may regret your words. In this case it was best to explain that seams are often needed when items are upholstered because of the limitation due to the width of the fabric.
In this particular case the fabric was a small herringbone pattern that only would work if the fabric were railroaded ( unless I wanted to create a vertical zig zag pattern ) That was not the vibe I wanted!

REPEAT: This is the second most important thing to note on fabric because it is crucial for selecting the proper pattern for the piece and being able to figure out how much fabric is needed. Every fabric should have a label with that information on it. There are 2 types of repeats:
Vertical: the amount of inches or centimeters it takes for a pattern to repeat up and down.
Horizontal : the amount of inches or centimeters it takes for a pattern to repeat from side to side. You need to know BOTH to correctly figure the amount of yardage needed and to specify how the fabric is applied.
Recently, I chose a cotton print that had a 36” vertical repeat with a 54” horizontal repeat for a pair of small arm chairs. This basically meant that a good bit of the 54” width was useless. Once the pattern was laid out down the front back of the chair only the area used to cover the width of the chair ( about 27” ) was useable.
Tip: If you are on a budget you may want to use expensive prints on pillows or in small limited places such as chair seats or even the backs of chairs.
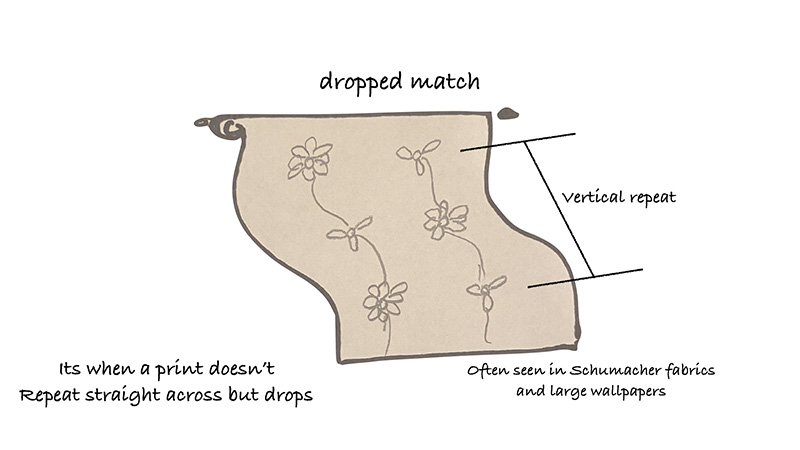
Drop Match: This is where it can get more complicated. Often this term refers to a print placement that does not repeat horizontally in a row but the pattern will drop at various places on the fabric. Typically, there is one drop repeat. When this happens you need to think through how that fabric will be placed on the upholstery piece. Often there is more waste involved so telling your upholstery company that the pattern has a drop match is a MUST.
In COM 102 we will put all this knowledge together in a workable form known as work orders. Then we will cover the following:
Work orders
Fabric placement discussed
Marking direction of fabrics
Spot placements
Marking fabrics on actual fabrics sent to factory
Provision of extra drawings
Of course there is much more than all of this. We need to know about different fabric constructions and so much more. The wonderful thing about our industry is there is always a challenge and a learning opportunity! However, if you master these two sessions you are well on your way to what we all want – more correctly placed orders!!!